Test-Driven Development with NUnitAsp
The NUnitAsp Tutorial
Warning: This tutorial has not been updated for v2.0.
NUnitAsp is based on the principle that testing web pages should use the same concepts as creating them. When you use NUnitAsp, you use classes and IDs similar to those you used when creating the web page you are testing.
In this tutorial, we'll walk you through the process of creating a simple one-page web application and tests. We assume you have some experience with ASP.NET and that you're using Visual Studio .NET (VS.NET) and Internet Information Server (IIS). The source for the "Guestbook" solution we create in this tutorial is located in the \sample directory of the NUnitAsp download. You can use the source as reference, but the tutorial doesn't discuss how to configure the files in the \sample directory to run. Instead, it assumes you will create your own solution and projects as you work through the tutorial.
Advanced users may get started more quickly by jumping straight to the QuickStart Guide.
About the Sample Application
The application we'll be creating in this tutorial is a simple on-line guest book. It allows users to enter a name and comment, which is then displayed on the page.
Functionally complete application
Create a Test Project
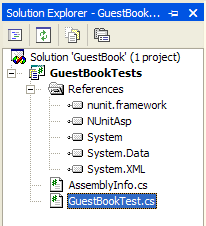
Create a project
Start by creating a class library project to contain your tests. We created a Visual Studio .NET solution named "GuestBook" and a C# class library project named "GuestBookTests." Create a text fixture class that describes what you're testing. We used "GuestBookTest." Finally, add references to the NUnitAsp and NUnit frameworks. NUnitAsp.dll is in the \bin directory of the NUnitAsp download and nunit.framework.dll is in the \bin directory of your NUnit install. The NUnitAsp framework appears in the VS.NET References tree as "NUnitAsp." The NUnit framework appears as "nunit.framework."
Once your project and text fixture class have been created, modify your class to extend WebFormTestCase. WebFormTestCase provides a "Browser" property for loading web pages. It also provides some handy extra assertions.
To simplify the code, you'll need to include two common NUnitAsp namespaces, NUnit.Extensions.Asp and NUnit.Extensions.Asp.AspTester, with "using" lines.
We're almost ready to try it out. The last thing we need is a test. The simplest possible test is an empty test, so add a public method that starts with the word "Test" and has no body. We named our empty test "TestNothing."
using NUnit.Extensions.Asp;
using NUnit.Extensions.Asp.AspTester;
namespace GuestBookTests
{
public class GuestBookTest : WebFormTestCase
{
public void TestNothing()
{
}
}
}
Compile the project. Now you have a working test! Admittedly, it doesn't do much. We'll expand it later. For now, let's run it to make sure everything is set up properly.
Run the First Test
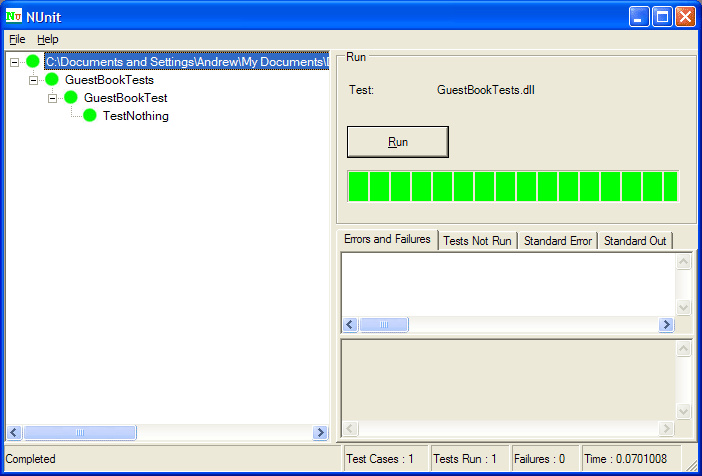
An easy way to run the tests is to start the nunit-gui.exe application and keep it open while debugging, using Alt-Tab to switch between nunit-gui.exe and VS.NET.
The nunit-gui.exe application monitors the currently loaded test assembly and reloads it automatically when it changes. This means you can keep an instance of nunit-gui.exe open and then run tests simply by clicking "Run," regardless of how you have changed your test assembly.
To use this method, start nunit-gui.exe separately from VS.NET. You can find nunit-gui.exe in the \bin directory of your NUnit install. Then, in nunit-gui.exe, open your test assembly using the "Open..." menu item (or drag the test assembly into the nunit-gui.exe window). Now you can make changes to your test assembly in VS.NET, use Alt-Tab to switch to nunit-gui.exe, and click "Run" to run the updated tests.
Now click the "Run" button in nunit-gui.exe. You'll see this screen:
Create a Real Test
Now we're ready to start testing our application. That's right, we're going to write our tests first. It's a style of programming called "Test-Driven Development," and it's part of the Extreme Programming methodology that programs like NUnit were created to support. In test-driven development, you create tests for features that you want, then write production code to make the tests pass. By doing so, you increase test coverage and reduce the amount of unnecessary production code.
In our case, the feature we want is a guest book. Testing every aspect of a guest book would take far too long, but we can test to see if the web page even exists. That's a broad test, but we can refine from there. We don't want to take too long between running tests—the goal is to check our code frequently so we always know we're on the right track.
First we'll modify our empty test to load the Web page we're going to write. WebFormTestCase, our parent class, provides a "Browser" property for getting web pages. Call "Browser.GetPage(web page url)" to load the page. We also changed the name of the test to something a little more meaningful.
{
Browser.GetPage("http://localhost/GuestBook/GuestBook.aspx");
}
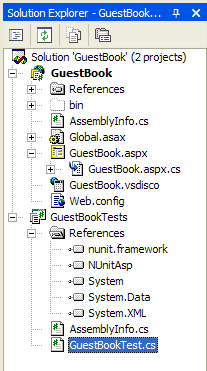
Create a web project
Now compile the test (Ctrl+Shift+B), switch to nunit-gui.exe, and run the test. It will fail, because the page doesn't exist yet, but we want to run it anyway. The reason is so that we find out immediately if things aren't working the way we expect. The sooner we know about problems, the easier it is to fix them. When testing with NUnitAsp (and NUnit), get into the habit of writing a small test, watching it fail, writing a few lines of code, watching the test pass, then refactoring. You should repeat this cycle every few minutes. If you do, you'll never get into a situation where you spend a lot of time debugging, and your code quality will remain high.
The test fails, as expected, so now we want to make it pass. Create a web project and the corresponding page. In our case, we created "GuestBook" as our web project and "GuestBook.aspx" as our web page. This page is at http://localhost/GuestBook/Guestbook.aspx if you've set up a virtual directory for it.
Now, when you run the test, it passes.
(If you receive a 401 Access Denied error, check your security settings. For example, try enabling anonymous access for the GuestBook virtual directory, and make sure the IUSR_machinename user has read access to the directory.)
Test the Layout
The next thing we'll test is the layout of our page. We don't test the look of our web page—we don't want to have to update our tests every time someone changes a font—but we do test the functionality. The first step towards doing this is just making sure the right components are on the page.
First, create a rough sketch showing the page to be created. No need to be fancy: this is just something for us to refer back to as we work, not formal documentation. In our guest book application, we want four components: a text field for entering a name (called "name"), a text field for entering a comment (called "comments"), a button to save the data in the guest book (called "save"), and a datagrid for displaying what people have entered (called "book").

To test these components, we have to create NUnitAsp "tester" objects. A tester is an object that corresponds to an ASP.NET control you want to test. You can instantiate the tester at any time—even before the page is loaded, if you like. When you instantiate it, you tell the tester the name of the ASP.NET control it's supposed to test and which control it's located on. Since we're going to test four controls on our guest book, we need to create four tester objects.
{
TextBoxTester name = new TextBoxTester("name", CurrentWebForm);
TextBoxTester comments = new TextBoxTester("comments", CurrentWebForm);
ButtonTester save = new ButtonTester("save", CurrentWebForm);
DataGridTester book = new DataGridTester("book", CurrentWebForm);
Browser.GetPage("http://localhost/GuestBook/GuestBook.aspx");
}
Let's take a closer look at the first declaration:
| Code Fragment | Meaning |
|---|---|
TextBoxTester name = new TextBoxTester("name", CurrentWebForm); | The object named "name" will test a text box. |
TextBoxTester name = new TextBoxTester("name", CurrentWebForm); |
The ASP.NET ID of the text box is "name." |
TextBoxTester name = new TextBoxTester("name", CurrentWebForm); |
Look for the control on the web form currently loaded by the browser. |
Now that we have the testers, we can assert that their controls are visible on the page.
{
TextBoxTester name = new TextBoxTester("name", CurrentWebForm);
TextBoxTester comments = new TextBoxTester("comments", CurrentWebForm);
ButtonTester save = new ButtonTester("save", CurrentWebForm);
DataGridTester book = new DataGridTester("book", CurrentWebForm);
Browser.GetPage("http://localhost/GuestBook/GuestBook.aspx");
AssertVisibility(name, true);
AssertVisibility(comments, true);
AssertVisibility(save, true);
AssertVisibility(book, true);
}
We've just told NUnitAsp to assert that the four controls are visible on the page. Again, looking at the first line of code:
| Code Fragment | Meaning |
|---|---|
AssertVisibility(name, true); |
Call the method in WebFormTestCase that checks control visibility. |
AssertVisibility(name, true); |
Check the visibility using the "name" tester. The tester knows its control is a TextBox whose ID is "name." |
AssertVisibility(name, true); |
The control should be visible. |
We're ready to run the test. We expect it to fail: we asserted that several controls were visible, but they're not. When we run the test, it does:
TestLayout: name control should be visible (HTML ID: name; ASP location: TextBoxTester 'name' in web form 'GuestBook')
This error message is in two parts. The first part tells us what failed (the 'name' control wasn't visible, as we expected). The second part, in parentheses, helps us track down the exact control that failed.
NUnitAsp always tells you the name of the control in two ways. First, it gives you the HTML ID of the control. This ID corresponds to the ID the control has when you use "View Source" in your browser. It's handy when you're looking at HTML: you can usually just do a "find" and type in the HTML ID to find your HTML-ized control. If it's visible, that is!
The second way NUnitAsp tells you about the control is with the ASP.NET location. It tells you the location of the control that failed, the control that it's in, the control that that control is in, etc., up to the name of the web form. This information is handy when you're looking at ASP.NET code.
In this simple example, all that information seems redundant. However, in ASP.NET, controls can be nested within other controls. The ID you give a control in ASP.NET can change into a completely different ID in HTML. The information in the error message helps you track down all the information you need to solve problems.
Let's make the tests pass by adding the four controls. We won't worry about looks just yet.
<asp:TextBox ID="name" Runat="server"></asp:TextBox>
<asp:TextBox ID="comments" Runat="server"></asp:TextBox>
<asp:Button ID="save" RunAt="server" Text="Save"></asp:Button>
<asp:DataGrid ID="book" RunAt="server"></asp:DataGrid>
</form>
Now run the test again. It still didn't pass! The data grid wasn't visible. This is a perfect example of why we run the tests so often. Sometimes we get surprised.
The data grid probably didn't show up because we haven't put any data in it yet. Well, after thinking about it, that's actually the behavior we want... when there's no data, don't display any results. Let's update the test to reflect this.
{
TextBoxTester name = new TextBoxTester("name", CurrentWebForm);
TextBoxTester comments = new TextBoxTester("comments", CurrentWebForm);
ButtonTester save = new ButtonTester("save", CurrentWebForm);
DataGridTester book = new DataGridTester("book", CurrentWebForm);
Browser.GetPage("http://localhost/GuestBook/GuestBook.aspx");
AssertVisibility(name, true);
AssertVisibility(comments, true);
AssertVisibility(save, true);
AssertVisibility(book, false);
}
Now the tests pass.
Test a Little Bit of Behavior
We have a web page, but it doesn't do anything yet. The next thing we want to see is that entering something updates the guest book. Naturally, we start by writing a test.
{
TextBoxTester name = new TextBoxTester("name", CurrentWebForm);
TextBoxTester comments = new TextBoxTester("comments", CurrentWebForm);
ButtonTester save = new ButtonTester("save", CurrentWebForm);
DataGridTester book = new DataGridTester("book", CurrentWebForm);
Browser.GetPage("http://localhost/GuestBook/GuestBook.aspx");
AssertVisibility(name, true);
AssertVisibility(comments, true);
AssertVisibility(save, true);
AssertVisibility(book, false);
}
public void TestSave()
{
TextBoxTester name = new TextBoxTester("name", CurrentWebForm);
TextBoxTester comments = new TextBoxTester("comments", CurrentWebForm);
ButtonTester save = new ButtonTester("save", CurrentWebForm);
DataGridTester book = new DataGridTester("book", CurrentWebForm);
Browser.GetPage("http://localhost/GuestBook/GuestBook.aspx");
name.Text = "Dr. Seuss";
comments.Text = "One Guest, Two Guest! Guest Book, Best Book!";
save.Click();
}
We've created a new test named "TestSave." It's has the same tester set up and page load that the "TestLayout" method does, but then it does something different: it assigns values to the web page and presses the "Save" button.
| Code Fragment | Meaning |
|---|---|
name.Text = "Dr. Seuss"; | Set the text of the "name" text box to "Dr. Seuss". |
comments.Text = "One Guest, Two Guest! Guest Book, Best Book!"; | Set the text of the "comments" text box. |
save.Click(); |
Click the "Save" button. |
Stop and take another look at the code. This is the heart of what NUnitAsp is all about. Although the test isn't actually working with an ASP.NET page—the page is raw HTML, like any rendered ASP.NET page—you can manipulate the controls on it with simple ASP.NET-like properties and methods. Pretty cool, and very easy. To write a test like this without NUnitAsp, you would have to know how ASP.NET renders each control to HTML, and then you'd have to manage that complexity every time you examined or set a control on the page. NUnitAsp abstracts this complexity away from you, enabling you to use ASP.NET-like syntax rather than worrying about how each control appears in rendered HTML.
Run the test. It passes, unsurprisingly. We're filling in the text and clicking "Save," but we're not actually asserting anything. Let's fix that. We'll start by asserting that the name and comment fields are reset to be blank after you save.
{
TextBoxTester name = new TextBoxTester("name", CurrentWebForm);
TextBoxTester comments = new TextBoxTester("comments", CurrentWebForm);
ButtonTester save = new ButtonTester("save", CurrentWebForm);
DataGridTester book = new DataGridTester("book", CurrentWebForm);
Browser.GetPage("http://localhost/GuestBook/GuestBook.aspx");
name.Text = "Dr. Seuss";
comments.Text = "One Guest, Two Guest! Guest Book, Best Book!";
save.Click();
AssertEquals("name", "", name.Text);
AssertEquals("comments", "", comments.Text);
}
The AssertEquals method is just a standard NUnit assertion, but here's the breakdown in case you're not familiar with it:
| Code Fragment | Meaning |
|---|---|
AssertEquals("name", "", name.Text); | Assert that two objects are equal. |
AssertEquals("name", "", name.Text); | The text to use in the failure message. |
AssertEquals("name", "", name.Text); | The expected results (an empty string). |
AssertEquals("name", "", name.Text); | The actual results (the text in the "name" text box). |
When you run the test, it fails!
TestSave : name
              String lengths differ. Expected length=0, but was length=9.
              Strings differ at index 0.

              expected: <>
              but was: <Dr. Seuss>
              ---------^
Were you surprised? I was. I had forgotten that the default behavior in ASP.NET is to preserve the values of its controls. For now, let's fix the problem by adding some code to the web page's code-behind to always initialize the text boxes to be blank. (If you wonder about this code, you're on to something. Keep reading.)
{
name.Text = "";
comments.Text = "";
}
Run the tests and see that they pass now.
Notice how similar the code-behind is to the tests? That's intentional. NUnitAsp will generally have the same methods on its testers that are on real ASP.NET objects.
Now for the meat of the test. We want to assert that the "book" data grid is populated with the user's name and comments. Since checking the contents of a data grid is a common need, NUnitAsp includes functionality to make this easy.
NUnitAsp allows you to treat a data grid as an array of cells. More accurately, it enables you to treat a data grid as an array of string arrays. The string arrays in the outer array correspond to the rows of the data grid, and the strings in the inner arrays correspond to the cells of the data grid. This is best illustrated by an example. A string array that looks like this:
{
new string[] {"Dr. Seuss", "One Guest, Two Guest! Guest Book, Best Book!"},
new string[] {"Dr. Freud", "Nice slip you have there."}
};
Corresponds to a data grid table that looks like this:
| Dr. Seuss | One Guest, Two Guest! Guest Book, Best Book! |
| Dr. Freud | Nice slip you have there. |
Unsurprisingly, DataGridTester has a method that returns the data grid's contents in an array in exactly this format. WebFormTestCase also provides several assertion methods that allow you to assert things about the contents of this kind of array. We'll use this functionality to assert that the guest book contains Dr. Seuss's comments after he presses the "Save" button. Note that we're only testing a single entry here, which means we only have one row, so our assertion array only has one outer element.
{
TextBoxTester name = new TextBoxTester("name", CurrentWebForm);
TextBoxTester comments = new TextBoxTester("comments", CurrentWebForm);
ButtonTester save = new ButtonTester("save", CurrentWebForm);
DataGridTester book = new DataGridTester("book", CurrentWebForm);
Browser.GetPage("http://localhost/GuestBook/GuestBook.aspx");
name.Text = "Dr. Seuss";
comments.Text = "One Guest, Two Guest! Guest Book, Best Book!";
save.Click();
AssertEquals("name", "", name.Text);
AssertEquals("comments", "", comments.Text);
string[][] expected = new string[][]
{
new string[] {"Dr. Seuss", "One Guest, Two Guest! Guest Book, Best Book!"}
};
AssertEquals("book", expected, book.TrimmedCells);
}
If you run the tests now, you see that the save test fails because NUnitAsp can't find a control named "book".
Remember when we changed the TestLayout test to succeed when the "book" element wasn't visible, because it didn't yet hold any data? TestSave is failing right now for a similar reason, except that we now want the grid to be visible, and to contain the information we've entered in the text boxes. Since we haven't added any functionality to the page to update the data grid when we click "Save," the data grid is still not visible.
Implement a Little Bit of Behavior
To fix this problem, let's add functionality to the page that updates the data grid with the information we enter when we click "Save." We already have the test that will show when we've implemented it correctly—now it's just a matter of writing the code that makes the test pass. As before, we're going to do it in very small pieces.
The test is complaining that the book isn't showing up when we click the "Save" button, right? So the simplest thing we can do to get this to pass is to put some data in the guest book DataGrid when the Save button is clicked. It doesn't have to be the right data yet... we're trying to take very small steps.
The first thing to do is to make the "Save" button call a method when it's clicked. To do that, we add the "OnClick" attribute.
<asp:TextBox ID="name" Runat="server"></asp:TextBox>
<asp:TextBox ID="comments" Runat="server"></asp:TextBox>
<asp:Button ID="save" RunAt="server" Text="Save" OnClick="Save_Clicked"></asp:Button>
<asp:DataGrid ID="book" RunAt="server"></asp:DataGrid>
</form>
And then we run the tests. We know they're going to fail, but we want to see an error saying that the Save_Clicked() method doesn't exist. That way we know we set this up properly.
Unfortunately, when ASP.NET discovers that we're trying to call a method that doesn't exist, it displays an error message rather than a regular web page. NUnitAsp doesn't realize what's going on and causes every test to fail with a strange error message:
TestLayout : server returned error (status code: 500). HTML copied to standard output.
When you see this error message from NUnitAsp, it's your clue that ASP.NET threw an exception. Look at the "Standard Out" tab of the NUnit GUI to see the HTML page it made to describe the problem, or use a web browser to manually reproduce your test.
In this case, when we look at the error, we see that it was a compilation error: "CS0117: 'ASP.GuestBook_aspx' does not contain a definition for 'Save_Clicked'". Exactly what we expected.
In order to get rid of the compilation error, we create a Save_Clicked() method. I can never remember exactly how to declare event methods like Save_Clicked, so I cheat and use Page_Load as a template, with one exception: the method needs to be protected, not private, because we're referencing it from the ASP.NET page. (It's protected because the ASP.NET page gets compiled into a class that extends our code-behind.)
After doing this, we run our tests again, and they're back to normal. They're not passing, because we still aren't doing anything to cause the guest book DataGrid to appear, but we've resolved the compilation error.
Now we need to get the book to appear. When I wrote the tutorial, I couldn't remember how DataGrid worked, so I just typed "book." into Visual Studio and scrolled through the list of methods. DataSource looked appropriate, so I assigned an array to it, then ran the tests. It worked!
{
book.DataSource = new string[] {"foo"};
book.DataBind();
}
Unfortunately, the tests still aren't passing. We're a little bit closer—the guest book is being displayed now—but the test expects to see Dr. Suess, not "foo".
A little bit of experimentation shows that arrays aren't going to get us a two-column data grid. We need something a little more sophisticated. So at this point, I took a few moments to research how DataGrid worked. I learned that I could use DataTable and DataRow to achieve the result I was looking for. With this knowledge, I hard-coded the right answer and got the test to pass.
{
DataTable table = new DataTable();
table.Columns.Add(new DataColumn("Name", typeof(string)));
table.Columns.Add(new DataColumn("Comments", typeof(string)));
DataRow row = table.NewRow();
row["Name"] = "Dr. Seuss";
row["Comments"] = "One Guest, Two Guest! Guest Book, Best Book!";
table.Rows.Add(row);
book.DataSource = table;
book.DataBind();
}
Refactor (with a note about SetUp)
Some of you right now are rolling your eyes in disbelief. The code above is obviously not good enough. How could I possibly be happy with it? Easy: I'm not! We're now at the third and most important stage of the test-driven development cycle: Refactoring.
When a programming example is broken down into step-by-step detail, as in this tutorial, it takes a lot of time to read and follow along. But if you had been implementing this yourself, only a few minutes would have passed. Since it's been so long, though, let me refresh your memory as to what's happened.
First, we wrote a small little test to support some new behavior. Then we wrote a small little bit of code to make the test pass. We wrote in the simplest way we could to get the test passing quickly.
If you write code this way all the time, always taking the simplest, easiest approach, you'll end up with a disjointed mess. Indeed, if you look at our code so far, it's not very good. And we've only implemented one little feature! The key to preventing the mess is to refactor each time you get a test to pass.
Refactoring is too big of a topic for me to cover here, so if you're not familiar with refactoring, check out Martin Fowler's Refactoring website, or search the web for more information. In brief, refactoring is changing the design of your code without changing its functionality, using small, predictable steps.
You decide what to refactor by looking for "code smells:" areas where the design of the code is poor. One of the easiest code smells to spot is duplication. If you have the same concept in multiple places, there's probably a design problem. Fixing this one issue aggressively whenever you see it will do a lot to keep your design quality high.
So, looking at our code, where's the duplication? The first is easy to spot: it's in our tests. We have the exact same set up code in both of our tests.
{
TextBoxTester name = new TextBoxTester("name", CurrentWebForm);
TextBoxTester comments = new TextBoxTester("comments", CurrentWebForm);
ButtonTester save = new ButtonTester("save", CurrentWebForm);
DataGridTester book = new DataGridTester("book", CurrentWebForm);
Browser.GetPage("http://localhost/GuestBook/GuestBook.aspx");
AssertVisibility(name, true);
AssertVisibility(comments, true);
AssertVisibility(save, true);
AssertVisibility(book, false);
}
public void TestSave()
{
TextBoxTester name = new TextBoxTester("name", CurrentWebForm);
TextBoxTester comments = new TextBoxTester("comments", CurrentWebForm);
ButtonTester save = new ButtonTester("save", CurrentWebForm);
DataGridTester book = new DataGridTester("book", CurrentWebForm);
Browser.GetPage("http://localhost/GuestBook/GuestBook.aspx");
name.Text = "Dr. Seuss";
comments.Text = "One Guest, Two Guest! Guest Book, Best Book!";
save.Click();
AssertEquals("name", "", name.Text);
AssertEquals("comments", "", comments.Text);
string[][] expected = new string[][]
{
new string[] {"Dr. Seuss", "One Guest, Two Guest! Guest Book, Best Book!"}
};
AssertEquals("book", expected, book.TrimmedCells);
}
We want to refactor this so its in only one place. Normally, we would put the common code in a single method and call that method from both tests. But NUnit provides another facility for us: the SetUp() method. This is a method that is automatically called before each test, and is exactly what we need.
In the interest of saving space, I haven't included all of the steps I used when I refactored. First I took the common code out of one method, moved it to SetUp(), and ran the tests. They passed. (As they always should when you refactor, since you're not changing functionality.) Then I took the common code out of the second method and ran the tests again, which passed again. The final code looks like this:
public class GuestBookTest : WebFormTestCase
{
private TextBoxTester name;
private TextBoxTester comments;
private ButtonTester save;
private DataGridTester book;
protected override void SetUp()
{
name = new TextBoxTester("name", CurrentWebForm);
comments = new TextBoxTester("comments", CurrentWebForm);
save = new ButtonTester("save", CurrentWebForm);
book = new DataGridTester("book", CurrentWebForm);
Browser.GetPage("http://localhost/NUnitAsp/sample/tutorial/GuestBook/GuestBook.aspx");
}
[Test]
public void TestLayout()
{
(duplication removed here)
AssertVisibility(name, true);
AssertVisibility(comments, true);
AssertVisibility(save, true);
AssertVisibility(book, false);
}
[Test]
public void TestSave()
{
(duplication removed here)
name.Text = "Dr. Seuss";
comments.Text = "One Guest, Two Guest! Guest Book, Best Book!";
save.Click();
AssertEquals("name", "", name.Text);
AssertEquals("comments", "", comments.Text);
string[][] expected = new string[][]
{
new string[] {"Dr. Seuss", "One Guest, Two Guest! Guest Book, Best Book!"}
};
AssertEquals("book", expected, book.TrimmedCells);
}
}
Readers familiar with NUnit will notice that we're not using the [SetUp] attribute. We're using a "protected override void SetUp" method instead. That's a quirk of the way NUnitAsp is put together. We're already using [SetUp] in NUnitAsp, so you can't use it yourself. Using the "protected override void SetUp" method will yield the same results. If you use [SetUp] with NUnitAsp, you'll get an exception.
Refactor More (with a note about debugging)
The duplication in the tests was obvious because the code was identical. The rule on duplication, though, isn't just duplication of code: it's duplication of concepts. If you have the same concept—the same knowledge—in two different parts of your program, it may be a target for refactoring.
The knowledge that we've duplicated is the knowledge of what's supposed to be in the guest book. It's in the test:
{
name.Text = "Dr. Seuss";
comments.Text = "One Guest, Two Guest! Guest Book, Best Book!";
save.Click();
AssertEquals("name", "", name.Text);
AssertEquals("comments", "", comments.Text);
string[][] expected = new string[][]
{
new string[] {"Dr. Seuss", "One Guest, Two Guest! Guest Book, Best Book!"}
};
AssertEquals("book", expected, book.TrimmedCells);
}
}
And it's in the production code:
{
DataTable table = new DataTable();
table.Columns.Add(new DataColumn("Name", typeof(string)));
table.Columns.Add(new DataColumn("Comments", typeof(string)));
DataRow row = table.NewRow();
row["Name"] = "Dr. Seuss";
row["Comments"] = "One Guest, Two Guest! Guest Book, Best Book!";
table.Rows.Add(row);
book.DataSource = table;
book.DataBind();
}
This isn't direct duplication of code, but it is duplication of a concept, and needs to be removed. It's easy:
{
DataTable table = new DataTable();
table.Columns.Add(new DataColumn("Name", typeof(string)));
table.Columns.Add(new DataColumn("Comments", typeof(string)));
DataRow row = table.NewRow();
row["Name"] = name.Text;
row["Comments"] = comments.Text;
table.Rows.Add(row);
book.DataSource = table;
book.DataBind();
}
At least, it seemed easy. When I first wrote this code, it didn't pass. The name and comments were blank. I scratched my head for a bit, then broke out the debugger. (If the answer seems obvious to you, realize that I took a break for about a year between writing the first and second halves of this tutorial!)
In order to debug an NUnitAsp test, you need to understand that NUnitAsp and ASP.NET are running in two separate processes. Your test code and your production code are actually two entirely separate programs. The only way they communicate is through the web server. Furthermore, the NUnit GUI (which runs your test code) is a standalone process! It doesn't run inside of Visual Studio by default.
So if you set a breakpoint and run your tests, nothing will happen. Visual Studio doesn't know about the processes that you're running. It's easy to fix: just pull down the "Debug" menu and select "Processes." You'll see a window that has a table labeled "Available Processes." To use breakpoints in your ASP.NET production code, select "aspnet_wp.exe" and click the "Attach" button. To use breakpoints in your NUnit and NUnitAsp test code, select "nunit-gui.exe" and click the "Attach" button. You can attach to both if you want.
Take a moment to try this out now. Set some breakpoints in different parts of your code and run your tests. Experiment with attaching to the two processes and see how the debugger treats your breakpoints differently.
Once I experimented with the debugger for a few minutes, I realized why the test was failing. Earlier, to get a test to pass, I had reset the name and comment in the Page_Load method.
{
name.Text = "";
comments.Text = "";
}
Page_Load is called every time the page is loaded, before my Save_Click method is called. So by the time the program gets to Save_Click, my name and comments have been reset! I needed to move that code to a better spot. Fortunately, there's an obvious spot: the end of the Save_Click method.
{
(code moved from here)
}
protected void Save_Clicked(object sender, EventArgs e)
{
DataTable table = new DataTable();
table.Columns.Add(new DataColumn("Name", typeof(string)));
table.Columns.Add(new DataColumn("Comments", typeof(string)));
DataRow row = table.NewRow();
row["Name"] = name.Text;
row["Comments"] = comments.Text;
table.Rows.Add(row);
book.DataSource = table;
book.DataBind();
name.Text = "";
comments.Text = "";
}
The tests pass, and now the code is clean. Time to add some more functionality.
Test a Little Bit More Functionality
If you play with our guest book manually, you'll see that it's not quite where we want it to be. Every time you hit the save button, the guest book is replaced. That's not what we want. We want a new row to be added with each click of the save button. Naturally, the first thing we do is write a test.
{
name.Text = "Dr. Seuss";
comments.Text = "One Guest, Two Guest! Guest Book, Best Book!";
save.Click();
name.Text = "Dr. Freud";
comments.Text = "That's quite a slip you have there.";
save.Click();
string[][] expected = new string[][]
{
new string[] {"Dr. Seuss", "One Guest, Two Guest! Guest Book, Best Book!"},
new string[] {"Dr. Freud", "That's quite a slip you have there."}
};
AssertEquals("book", expected, book.TrimmedCells);
}
Again, we're doing the simplest thing we can to get the test working, even though it means duplicating some code from TestSave. We know we're coming back to refactor in just a few minutes.
Implement a Little Bit More Functionality
The test fails, as expected. To get it to pass, we have to get our DataTable to persist across multiple invocations. We'll use the user's session for that.
(Storing it in the session isn't really correct, as it doesn't allow multiple people to access the same guest book. But it's good enough for the purposes of this tutorial.)
{
DataTable table = (DataTable)Session["GuestBookData"];
if (table == null)
{
table.Columns.Add(new DataColumn("Name", typeof(string)));
table.Columns.Add(new DataColumn("Comments", typeof(string)));
}
DataRow row = table.NewRow();
row["Name"] = name.Text;
row["Comments"] = comments.Text;
table.Rows.Add(row);
book.DataSource = table;
book.DataBind();
Session["GuestBookData"] = table;
name.Text = "";
comments.Text = "";
}
Refactor
Again, in our desire to get the functionality implemented, we left some bad code behind. That's okay... we knew we were doing it, but we didn't mind, because we knew we were going to refactor. The code smell is duplication, and it's in the tests again. This time, we're duplicating code that enters a name into the guest book.
public void TestSave()
{
name.Text = "Dr. Seuss";
comments.Text = "One Guest, Two Guest! Guest Book, Best Book!";
save.Click();
AssertEquals("name", "", name.Text);
AssertEquals("comments", "", comments.Text);
string[][] expected = new string[][]
{
new string[] {"Dr. Seuss", "One Guest, Two Guest! Guest Book, Best Book!"}
};
AssertEquals("book", expected, book.TrimmedCells);
}
[Test]
public void TestSaveTwoItems()
{
name.Text = "Dr. Seuss";
comments.Text = "One Guest, Two Guest! Guest Book, Best Book!";
save.Click();
name.Text = "Dr. Freud";
comments.Text = "That's quite a slip you have there.";
save.Click();
string[][] expected = new string[][]
{
new string[] {"Dr. Seuss", "One Guest, Two Guest! Guest Book, Best Book!"},
new string[] {"Dr. Freud", "That's quite a slip you have there."}
};
AssertEquals("book", expected, book.TrimmedCells);
}
That code is easily factored out.
public void TestSave()
{
SignGuestBook("Dr. Seuss", "One Guest, Two Guest! Guest Book, Best Book!");
AssertEquals("name", "", name.Text);
AssertEquals("comments", "", comments.Text);
string[][] expected = new string[][]
{
new string[] {"Dr. Seuss", "One Guest, Two Guest! Guest Book, Best Book!"}
};
AssertEquals("book", expected, book.TrimmedCells);
}
[Test]
public void TestSaveTwoItems()
{
SignGuestBook("Dr. Seuss", "One Guest, Two Guest! Guest Book, Best Book!");
SignGuestBook("Dr. Freud", "That's quite a slip you have there.");
string[][] expected = new string[][]
{
new string[] {"Dr. Seuss", "One Guest, Two Guest! Guest Book, Best Book!"},
new string[] {"Dr. Freud", "That's quite a slip you have there."}
};
AssertEquals("book", expected, book.TrimmedCells);
}
private void SignGuestBook(string nameToSign, string commentToSign)
{
name.Text = nameToSign;
comments.Text = commentToSign;
save.Click();
}
There's still a little duplication between the assertions and the test setup, but not so much that the code would be clearer if we refactored it. If additional tests showed that the duplication kept occuring, then I probably would refactor it, too. We're done.
Test Boundary Conditions
Well, we're not really done. It's true that the program is doing what we set out to do. But it's only handling the basic case. What happens when we throw bad data at it? The correct way to find out is to write tests for these things.
I'm going to leave these tests as an exercise for you to do on your own. There's several tests that you could write. I would write tests for empty fields. What do we want to happen if the user clicks save but hasn't filled in his name? What if he filled in his name, but not a comment? What happens if the user comes back to the page after leaving it?
And if you're not thinking about security, give yourself a good shaking. What happens when a user enters HTML into one of these fields? What do we want to happen? Write tests for those cases.
Questions about these sorts of boundary conditions will come up as you're writing the main line of your code. Don't let them distract you, but don't forget them, either. Once you have the main case working, start writing tests for the boundary conditions. Brainstorm and let them all come out. By this time, your test fixture has probably been refactored a few times, so adding lots of tests for obscure cases should be easy. Some of them might pass right away; others will require you to update your production code.
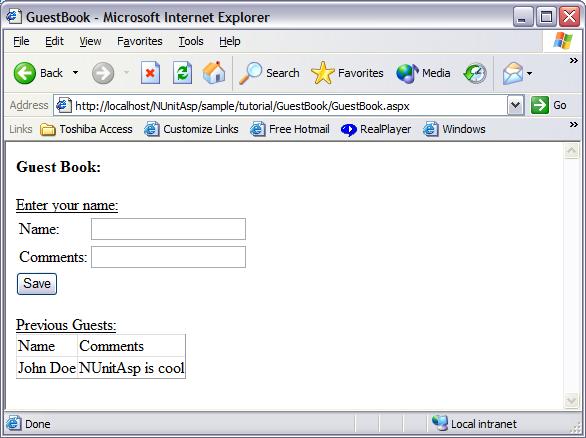
Make it Pretty
After you've tested your functionality and boundary conditions, pat yourself on the back. You've got a good, solid piece of code. Now you get to do the fun part: making it look pretty!
This part is the easiest. You don't have to write any more code: just tweak and play with the look of the page to your heart's content. As long as you don't change ID's, NUnitAsp doesn't mind if you move components around. Run the tests every so often to make sure you didn't accidently break anything.
For our guest book, I didn't get very fancy. I just made sure the components lined up decently and had appropriate headers.
<p><b>Guest Book:</b></p>
<u>Enter your name:</u>
<table>
<tr><td>Name:</td><td><asp:textbox id="name" Runat="server"></asp:textbox></td></tr>
<tr><td>Comments:</td><td><asp:TextBox ID="comments" Runat="server"></asp:TextBox></td></tr>
</table>
<asp:Button ID="save" Runat="server" Text="Save" OnClick="Save_Clicked"></asp:Button>
<br /><br /><u>Previous Guests:</u>
<asp:DataGrid id="book" runat="server"></asp:DataGrid>
</form>
Conclusion
As you start writing your own tests with NUnitAsp, try following the pattern used in this tutorial. To write this tutorial, I simply wrote down what I did while creating the sample application. Other than the limited scope of the application, nothing about this tutorial is simplified. Experienced test-driven development programmers really do run tests every couple of minutes, even when they know the results. Once you get used to it, it evolves into a predictable rhythm:
Write test...
...watch test fail.
Write code...
...watch test pass.
Refactor...
...watch test pass.
Write test...
...watch test fail.
Write code...
...watch test pass.
Refactor...
...watch test pass.
Write test...
...watch test fail.
Write code...
...watch test pass.
Refactor...
...watch test pass.
Every so often, the rhythm will be broken. A test will fail when it shouldn't, or fail for the wrong reason, or even pass when it shouldn't. If you've been running tests every few minutes, then the defect is in the last few minutes' work... it only takes a few seconds to figure out your mistake. If you haven't been running tests often, though, you'll have to spend a lot more time debugging.
These are the steps I really do follow when creating new web pages:
- Create a test class.
- Create an empty test.
(Watch test pass) - Modify the test to navigate to the web page.
(Watch test fail) - Create the web page.
(Watch test pass) - Test the layout.
(Watch test fail) - Add controls to the web page.
(Watch test pass) - Repeat the following until all desired behavior is present:
- Test a small amount of behavior
(Watch test fail) - Implement a small amount of behavior
(Watch test pass) - Refactor
(Watch test pass)
- Test a small amount of behavior
- Repeat the following until all boundary conditions are handled:
- Test a single boundary condition
(Watch test fail) - Fix a single boundary condition
(Watch test pass) - Refactor
(Watch test pass)
- Test a single boundary condition
- Make it pretty.
Test-driven development is a relaxing, low-risk approach to software development. Once you get used to it, it's fast and reliable. Follow the pattern above, and you'll spend more time adding features and less time fixing defects.
Now you're ready to do your own test-driven development with NUnitAsp! Before you get started, be sure to review the Quick-Start Guide. It consolidates the information in this tutorial and includes a few more details.
by James Shore with Andrew Enfield
Last updated for v1.5.